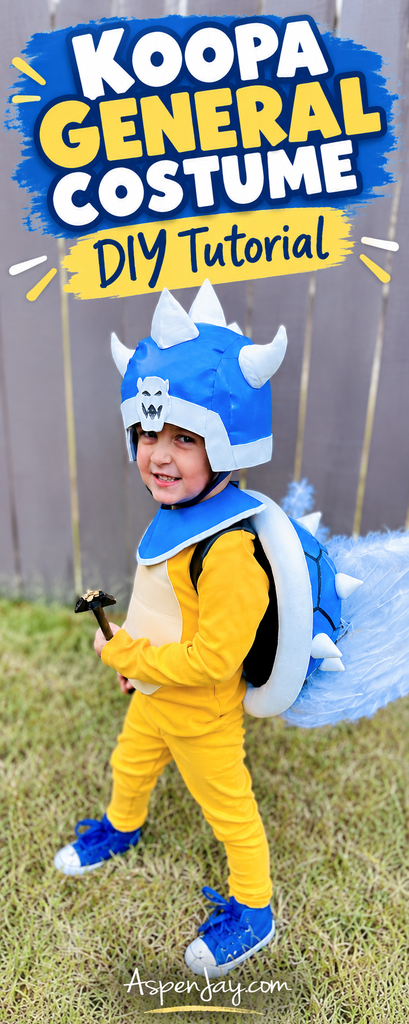
Make your child’s dreams come true by dressing them in a Super Mario Bros. Koopa General costume this year for Halloween! With a little creativity and a few simple supplies, you can make it happen. In this post, I’ll show you how we made our Koopa General costume so your child can rock this epic character!
Post contains affiliate links at no extra cost to you.
After The Super Mario Bros. Movie came out, it instantly became a favorite with my children. They had already been collecting the Super Mario Bros. cars for a few years, so when they finally got to see their favorite characters come to life on the big screen, they were hooked!
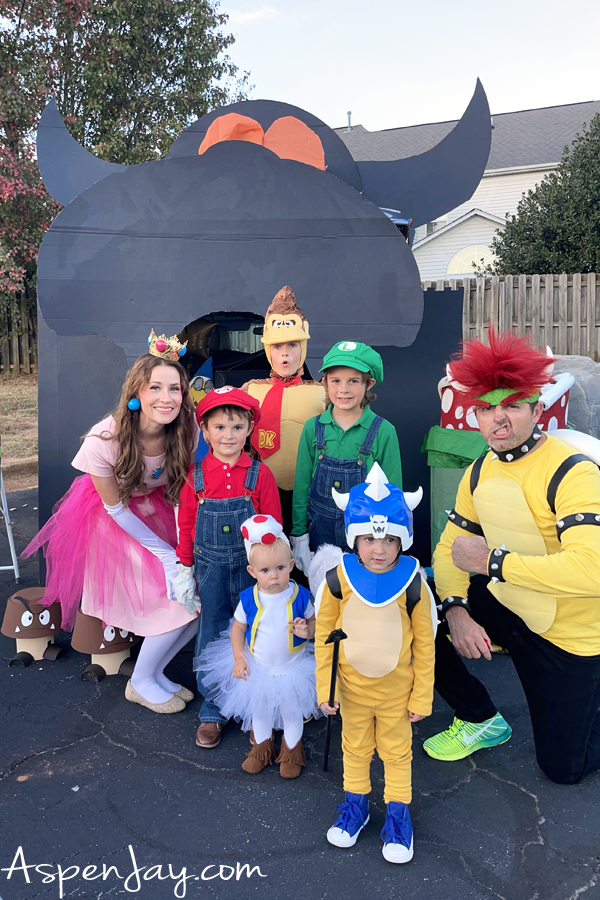
I had originally planned a completely different theme for our annual family Halloween costumes, but that idea was quickly pushed aside in favor of a Super Mario-themed family costume. I’m actually glad it was, because our Bowser’s Castle trunk-or-treat display turned out amazing, and our costumes turned out pretty awesome, if I do say so myself—especially the Koopa General!
Who Is the Koopa General?
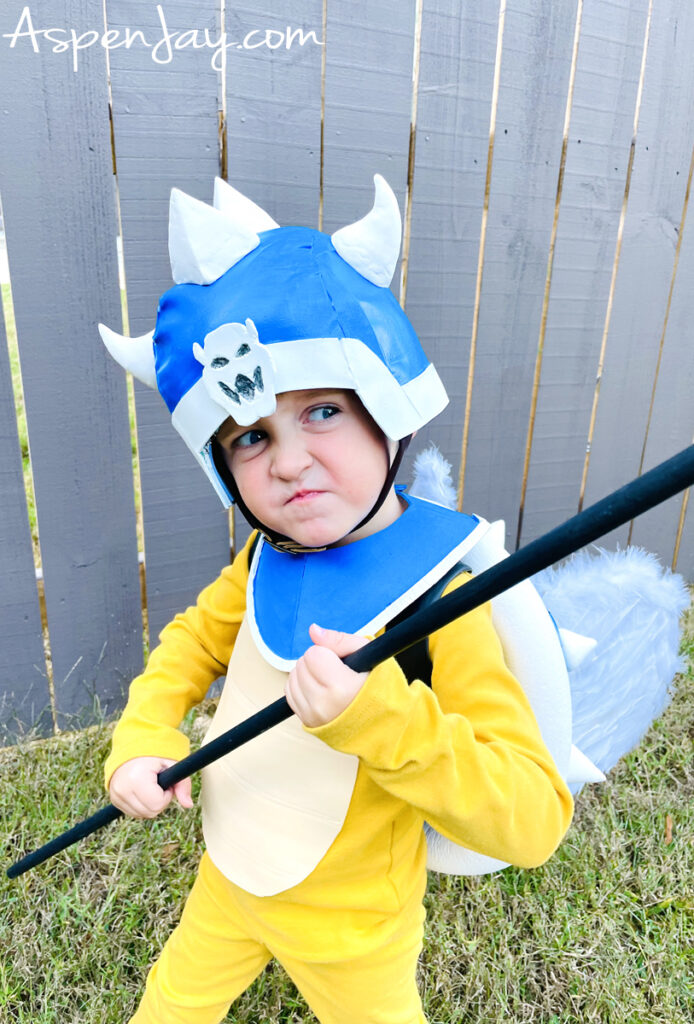
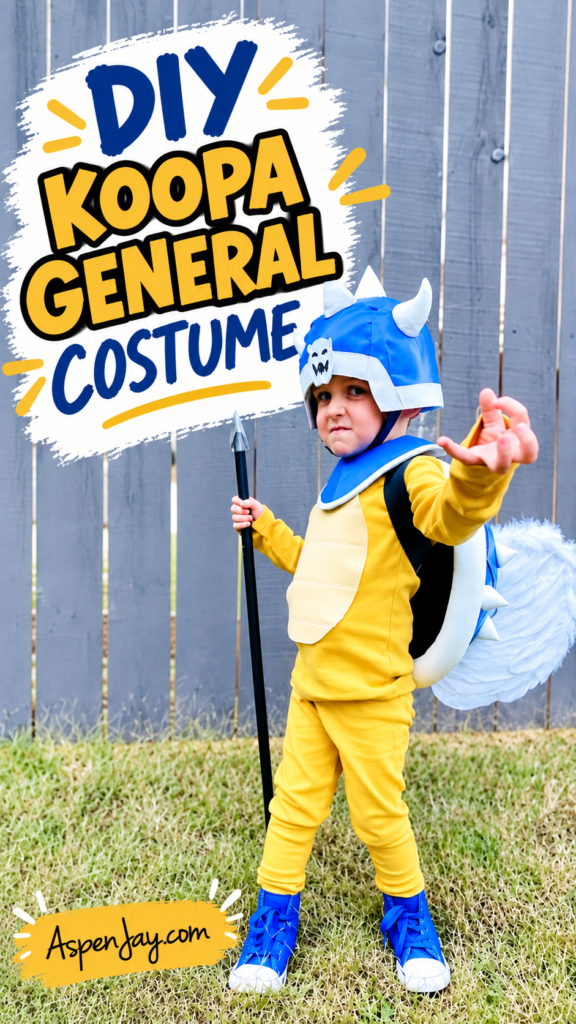
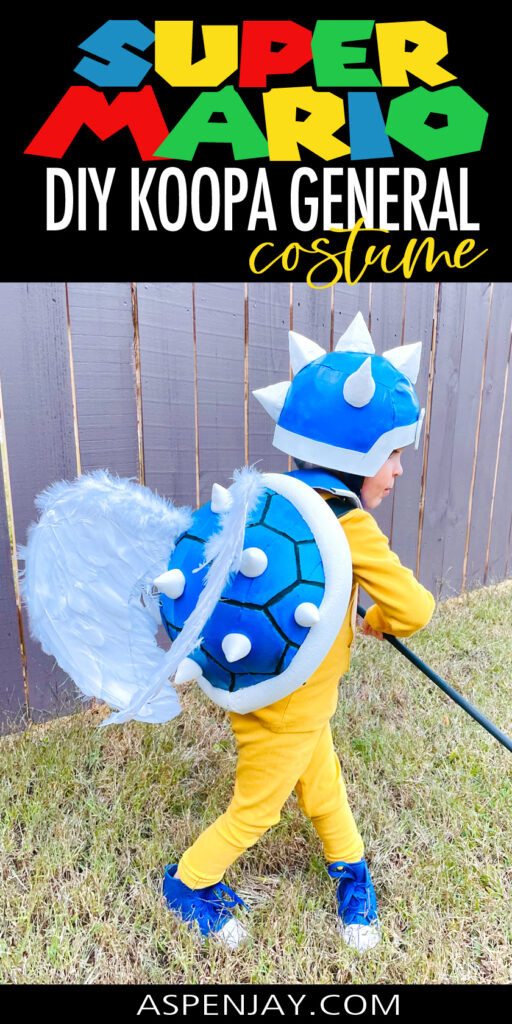
The Koopa General is a villain introduced in The Super Mario Bros. Movie. He is Bowser’s top lieutenant and leads the Koopa army in its attempts to capture the Mushroom Kingdom. He’s recognizable by his blue armor, large shell, spikes, wings, and distinctive helmet.
The Koopa General even gets one of the movie’s more memorable moments when he carries out a kamikaze self-detonation attack against Mario and Luigi—which doesn’t end particularly well for him.
But don’t tell my son that, because the Koopa General was his favorite character! His older brothers tried to explain to him what happened, but he is pretty set in his mind that it didn’t happen quite the way they suggested. Since the movie never explicitly shows that he died, my son is firmly in denial.
When we started deciding which characters everyone would be for Halloween, the obvious choices included Mario, Luigi, Bowser, Princess Peach, and Donkey Kong. Everyone was pretty open to choosing whichever character seemed like the best fit.
Everyone, that is, except my youngest son.
From the very beginning, he knew exactly who he wanted to be: the Koopa General.
I admit, the Koopa General wasn’t even on my radar when we first started planning our costumes. But once he picked the Koopa General, there was no convincing him otherwise! And as it turned out, he ended up being a pretty perfect choice—and his costume became one of my favorites of the whole group.
Table of Contents
- Supplies Needed
- How to Make a Koopa General Costume
- Finished Costume
- Tips
- Super Mario Bros. Family Costumes
- FAQs
What You’ll Need to Make a Koopa General Costume
Are you ready to make this epic costume? There are quite a few supplies needed for this project, but remember, your finished costume is going to be pretty awesome—not one of your run-of-the-mill costumes! So don’t let the list scare you away. I’ve put together a list of all the materials and tools you’ll need to make this Super Mario Bros. villain, so you can easily see what you’ll need before you get started.
Materials:
- Plastic wrap – for creating the shell mold
- Duct tape – for creating the shell mold
- Black EVA foam sheet roll – for making the shell
- Super glue
- Gesso primer – to fill in the seams of the shell
- Plasti Dip – for sealing and priming the foam pieces before painting
- White acrylic paint
- Blue acrylic paint
- Foam clay – for the spikes and helmet horns
- Foam semi-slit pipe insulation – for creating the rim of the blue shell
- Plastic bump cap insert – for creating the base of the helmet
- Thin foam sheets – for the armor and helmet
- Black faux leather – for the shell straps
- Leather strap with buckle – for the helmet
- Wings – for the shell
- Yellow outfit
- Blue high-top shoes
Tools:
- Scissors
- Black Sharpie
- Utility knife
- Heat gun – for shaping the EVA foam
- Soldering iron – for creating the shell and armor indentations
How to Make a Koopa General Costume
I’d say this Koopa General costume tutorial is a little more in-depth—not difficult, but maybe not for the faint of heart either! There are quite a few steps, and some of the techniques may be new to you.
But believe me, if I can do this with absolutely no experience using a heat gun, so can you! Once you dive in and start working with the materials, it’s all pretty straightforward. I’d even say it’s easy once you get going. You just have to take the plunge and get started!
I’ll walk you through the entire process step by step, so don’t feel like you have to figure it all out at once. Just tackle one piece at a time, and you’ll get there!
1. Creating the Blue Shell
Make the Shell Pattern
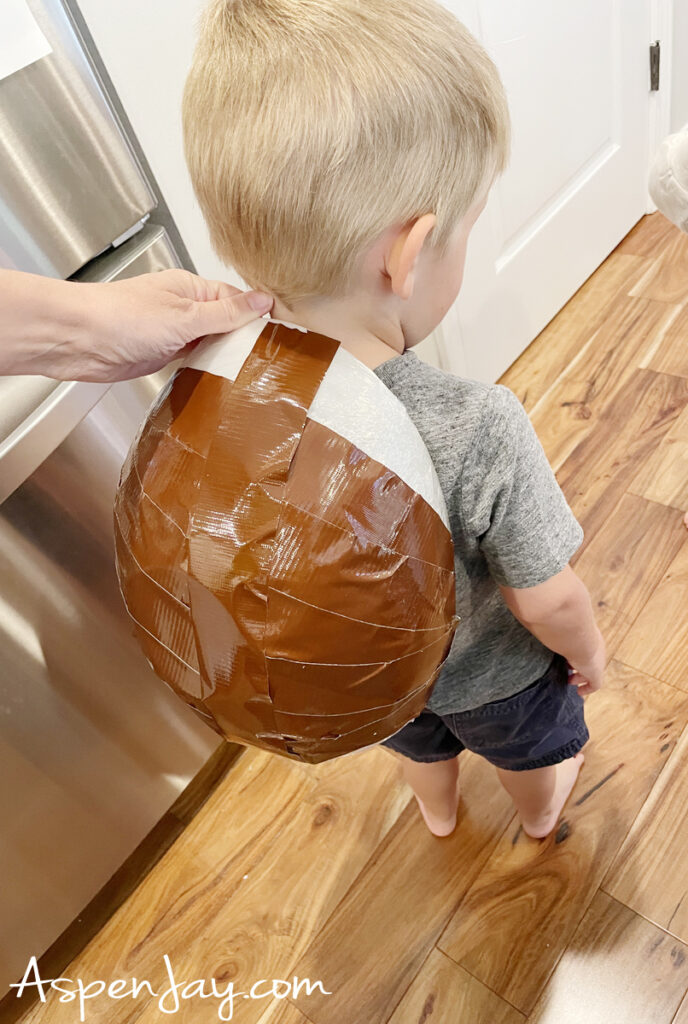
To make the Koopa General’s blue shell, you’ll need to create a mockup or pattern first. I started with a plastic bowl that was about the size I wanted the finished shell to be. I actually bent the bowl slightly to help create the shape I was looking for.
Once I had the shape I wanted, I covered the outside of the bowl with plastic wrap and then covered the plastic wrap with duct tape.
Don’t skip the plastic wrap! It’s what allows you to remove the duct-tape mold from the bowl. Without it, you’d have a very hard time getting the duct tape off!
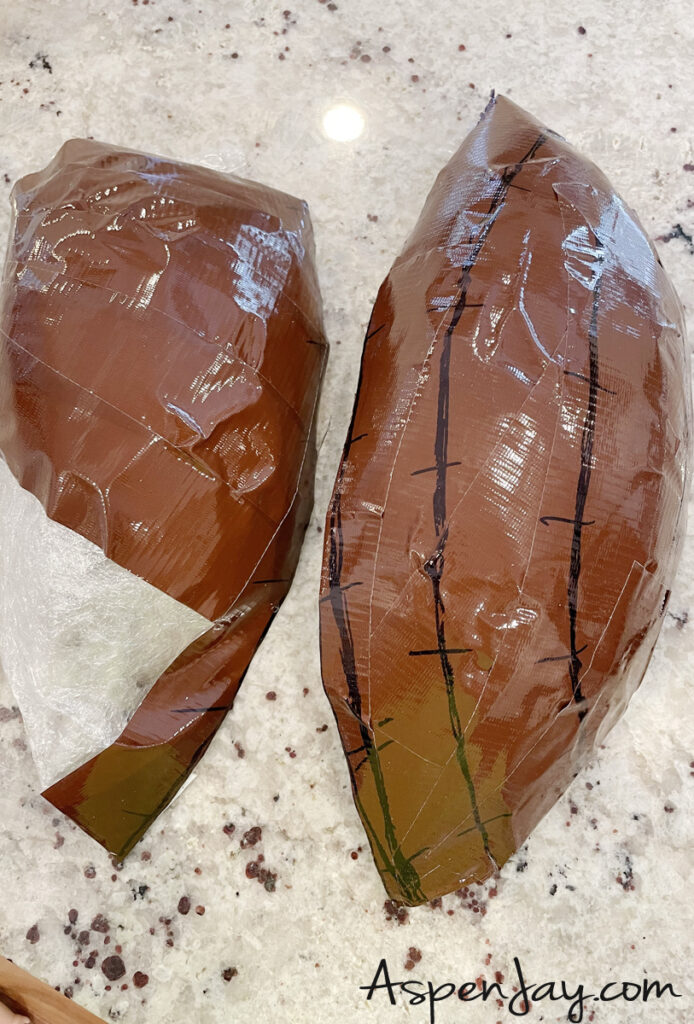
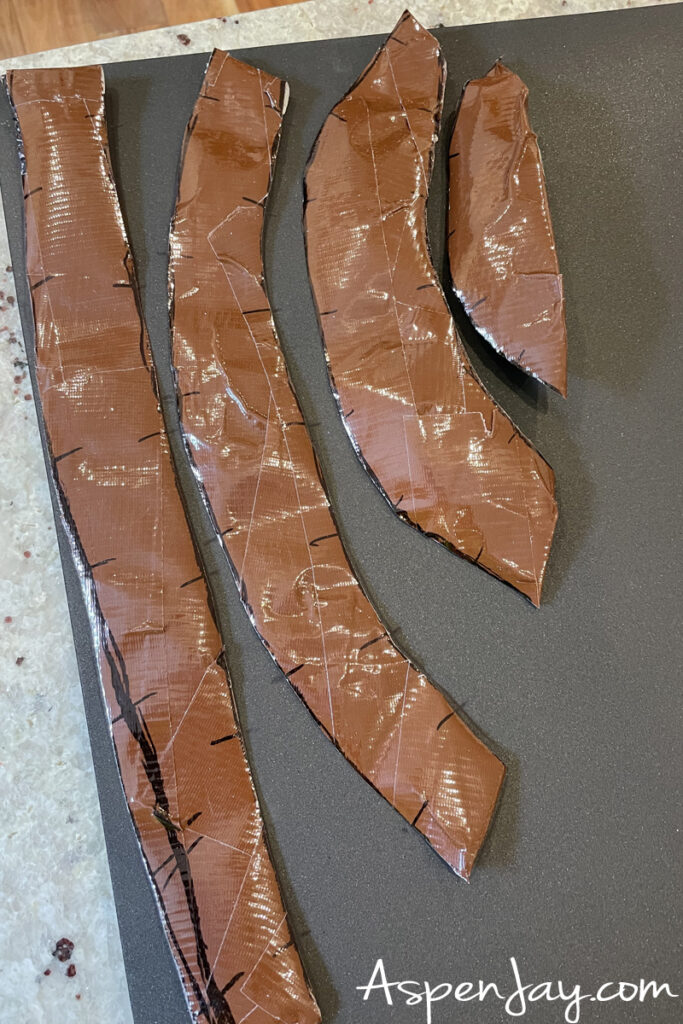
Once your duct-tape mold is complete, use a black Sharpie to draw long vertical lines down the shell. These are the lines you’ll eventually cut along to create your pattern pieces. Then add shorter horizontal lines across each vertical section.
Those little horizontal marks may not seem important now, but they will help you line the pieces back up correctly when you transfer the pattern onto your EVA foam.
Cut the EVA Foam
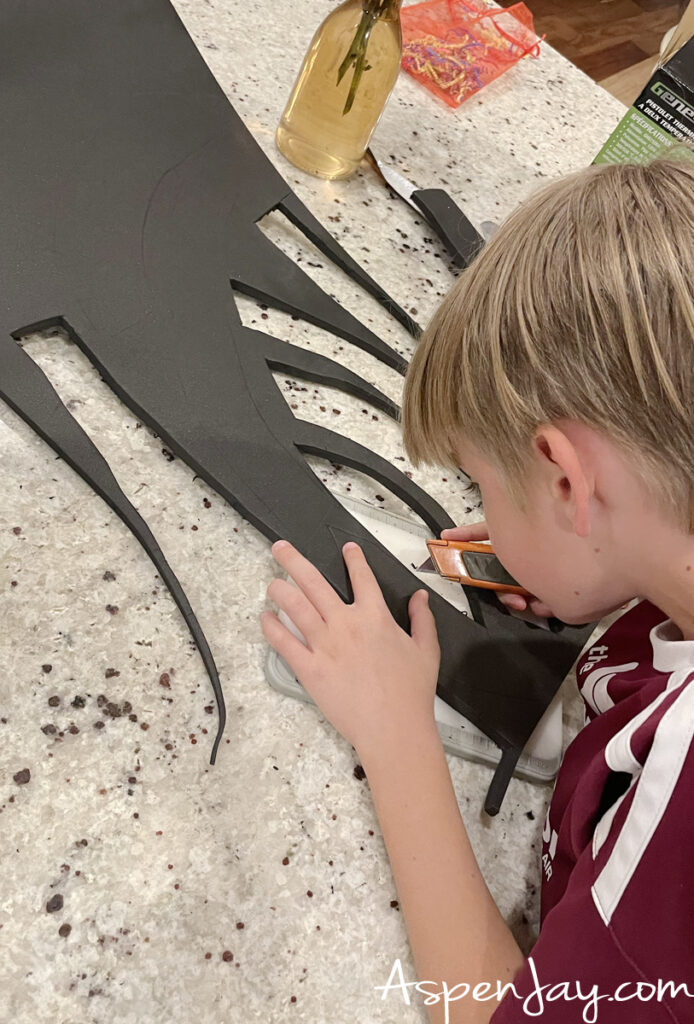
Now lay your duct-tape pattern pieces onto your black EVA foam and trace around each piece with a pencil. Be sure to transfer those little horizontal guide marks onto the foam as well. Since you’ll be cutting away some of the edges, mark them far enough inward that they’ll still be visible after cutting.
Once everything is traced, grab your utility knife and carefully cut out your pieces. I found it helpful to put a cutting board underneath the foam so I didn’t damage the surface I was working on.
At this point, you’ll have a bunch of pieces that look a little like a puzzle—but don’t worry! Those pieces are about to become your shell.
Shape the Shell
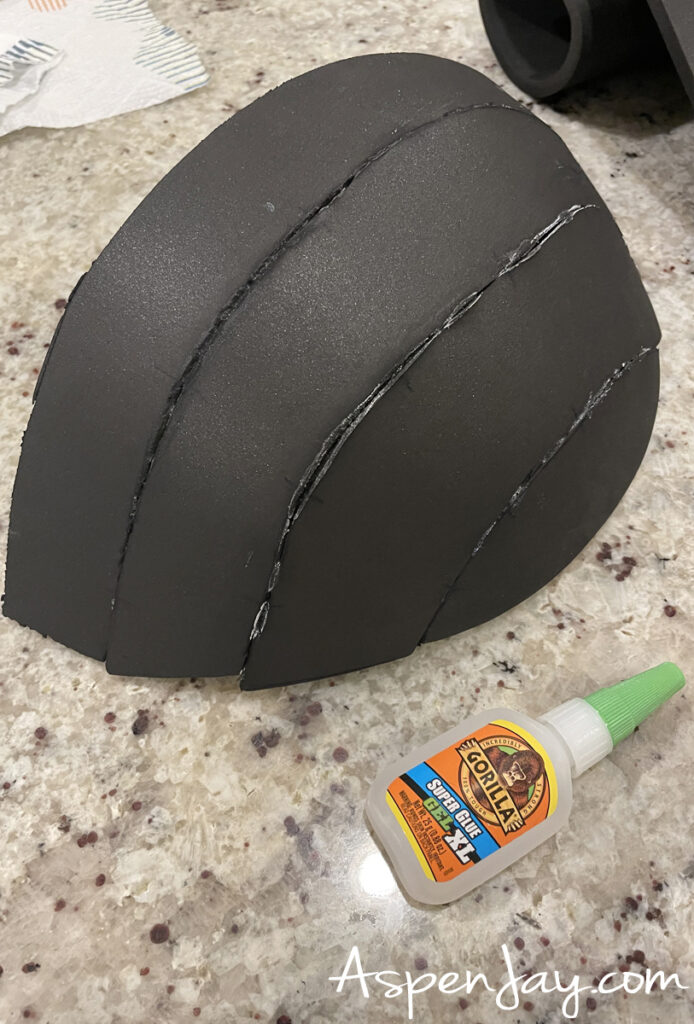
So far so good? Great! Now it’s time to put your puzzle pieces together! Use the horizontal guide marks you made earlier to line the pieces up correctly.
Since EVA foam starts out flat, you’ll need to shape it into the rounded form of the blue shell. This is where your heat gun comes in, which is very inexpensive by the way!
Work carefully and slowly with the heat gun. Warm the foam gradually and gently bend and stretch it into the curve you want. You don’t need to get it perfect right away—you can continue heating and shaping the foam until you get the rounded shell shape you’re looking for.
Once the pieces are shaped, glue them together with super glue.
Add the Shell Details and Paint
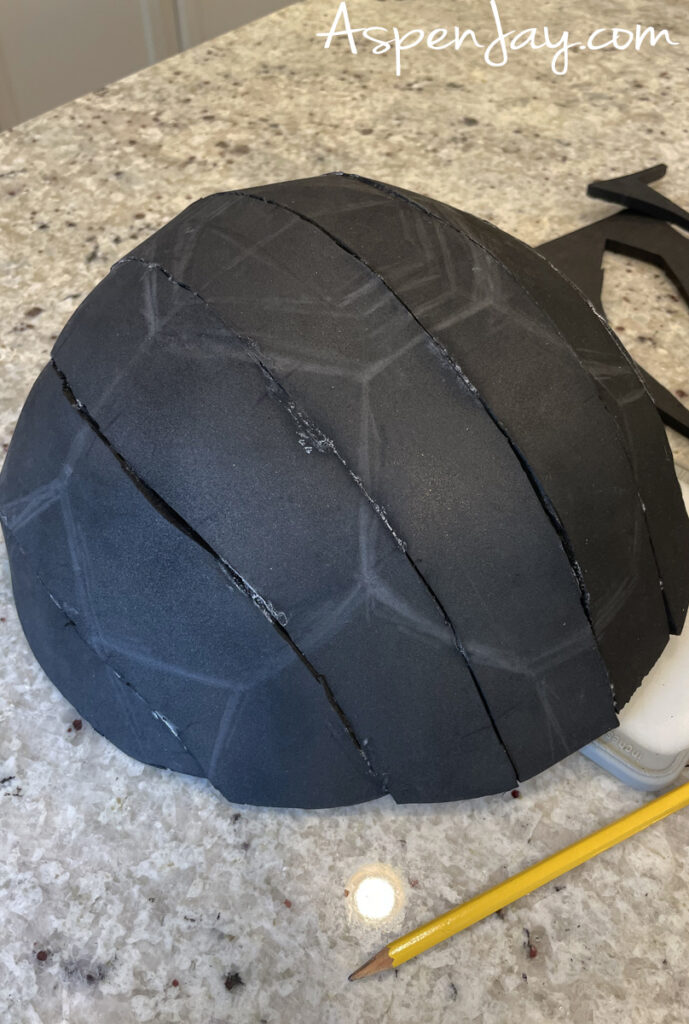
Next, I created a hexagon stencil in the size I wanted and used it to mark the indentations on the shell.
Once the design was marked out, I took the shell outside onto my front porch and used a soldering iron—also very inexpensive, by the way! That’s the exact one I used—to carefully create the recessed lines. Make sure you’re working in a very well-ventilated area when heating EVA foam, and follow the safety instructions for your tool. I also recommend wearing appropriate eye and respiratory protection.
Once the shell was finished, I used a little gesso primer to fill in the seams and smoothed them out as much as possible.
Then I sprayed the entire shell with Plasti Dip. This seals the surface of the foam and creates a better base for painting. In a sense, it acts as a primer layer and also helps prevent the paint from cracking.
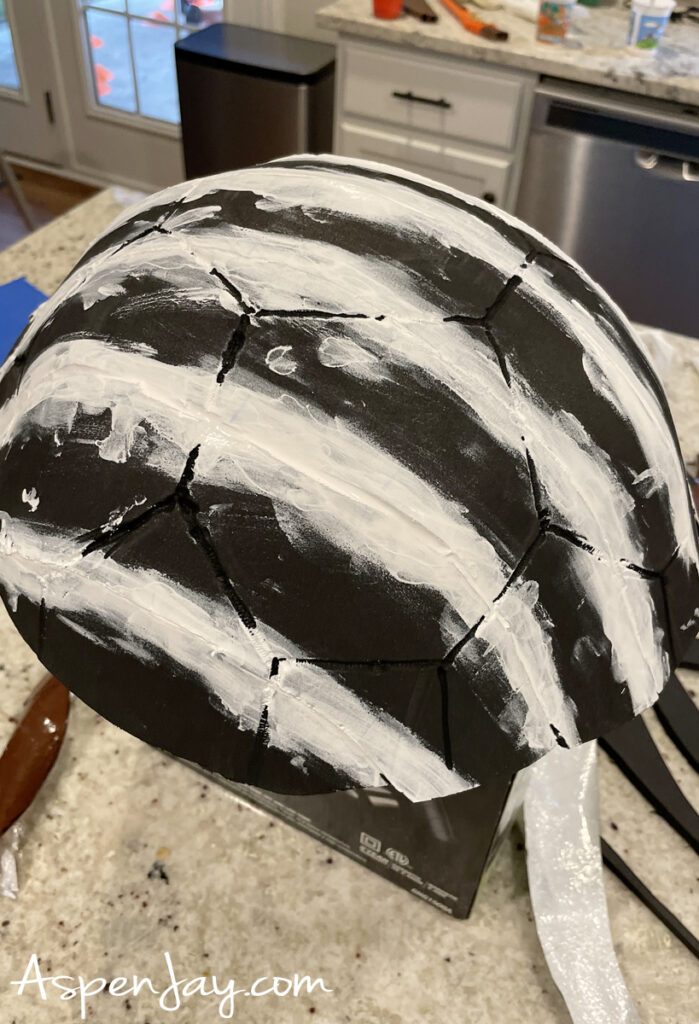
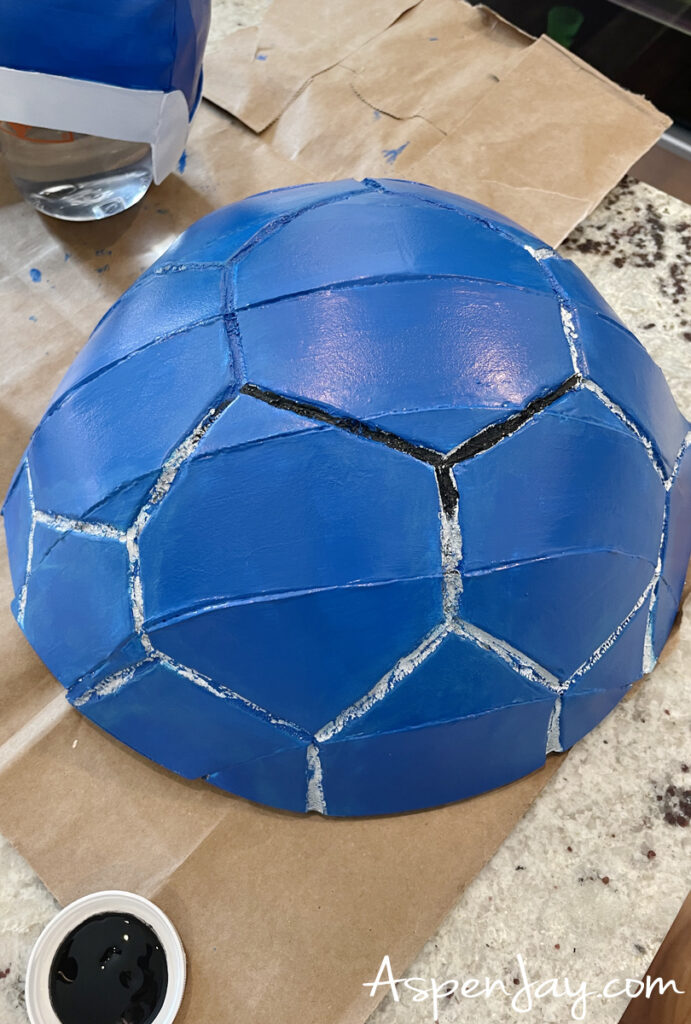
Now comes the fun part—painting, which will really make the shell come to life!
I painted the body of the shell blue with acrylic paint. I didn’t worry too much about getting paint in the indentations because I knew I’d come back later with a smaller brush and fill those areas in with black paint.
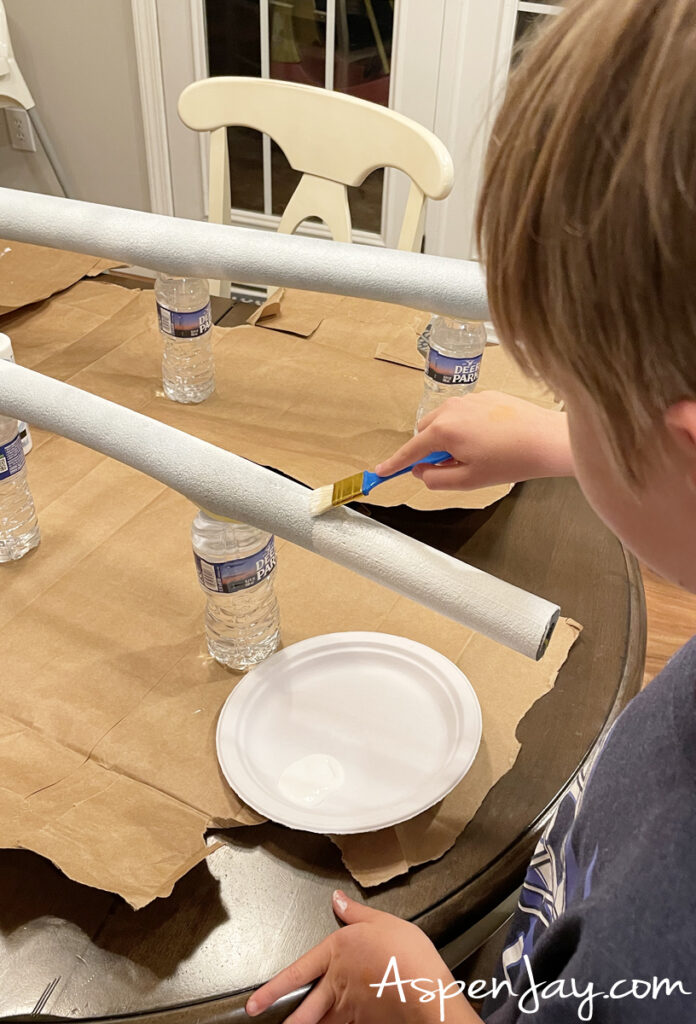
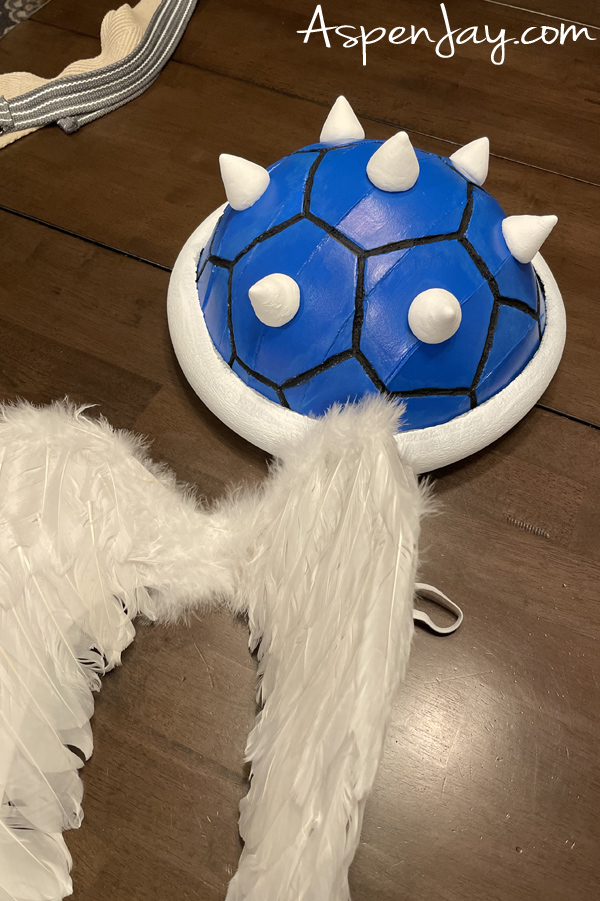
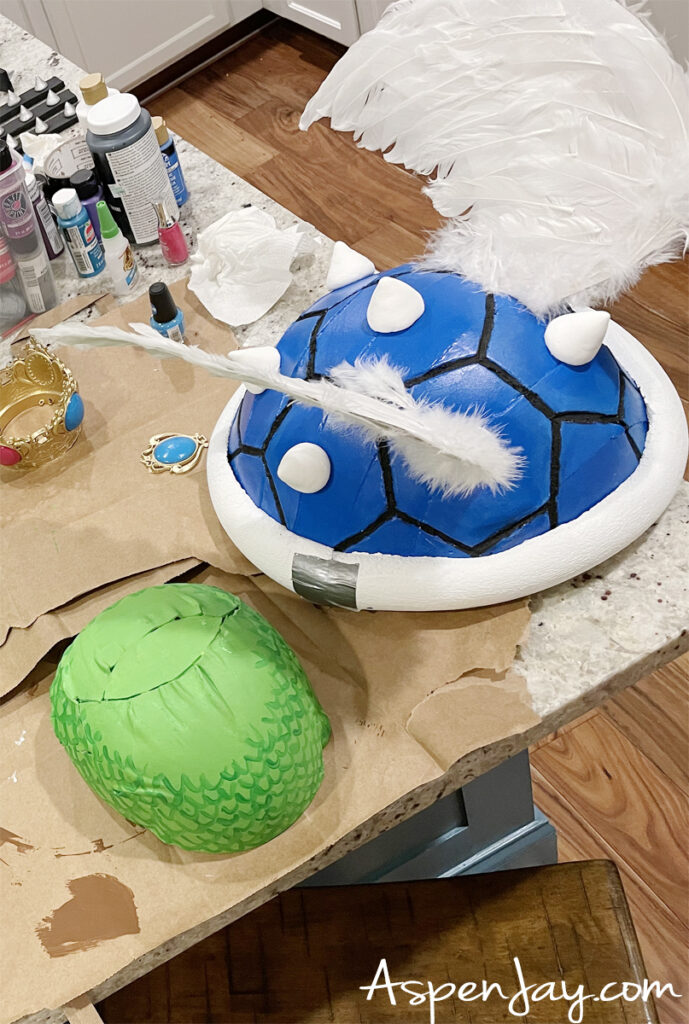
For the white border around the shell, I used foam semi-slit pipe insulation—aka a pool-noodle-looking thing!—with adhesive backing. I sprayed the pieces with Plasti Dip, let them dry, and then painted them white.
Add the Spikes, Straps, and Wings
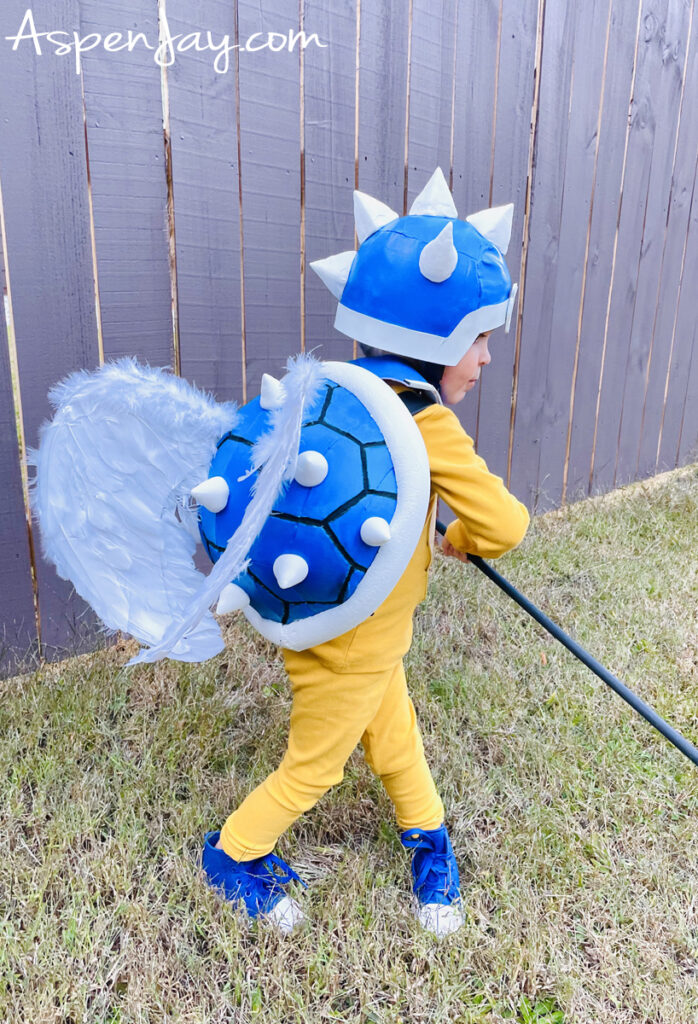
While the paint was drying, I used foam clay to hand-make the large, Hershey-kiss-shaped spikes for the shell. Once they were completely dry, I attached them with super glue. Since the pool noodle material already had adhesive on it, I was able to simply wrap it around the shell.
Doesn’t it look fabulous? I honestly couldn’t believe I had actually made this!
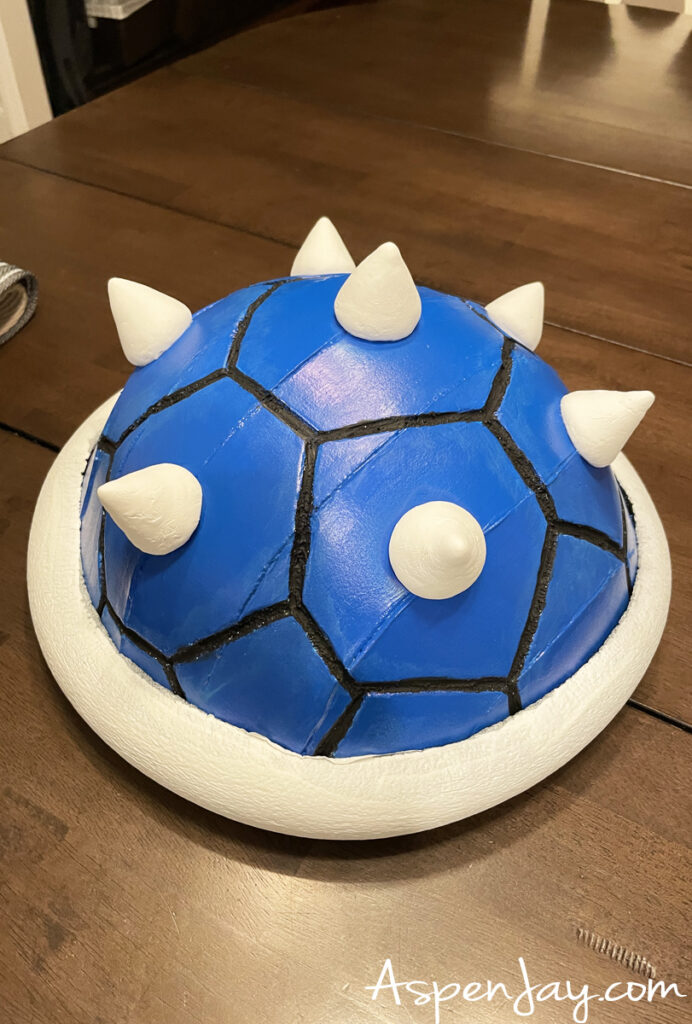
To make the shell wearable, I created straps so it could be worn like a backpack. I used faux leather over pieces of cereal-box cardboard to create the straps, then measured carefully to make sure the shell would sit comfortably on my son.
I attached the straps to the inside of the shell with super glue so he could easily put the shell on and take it off.
And then came a very sad part of the whole creation process. I actually couldn’t bear the thought of cutting into all that hard work, so I handed the job off to my husband to cut through the finished shell!
The Koopa General’s shell has blue wings, so I needed to create openings for them. He used a utility knife to carefully cut slits in the shell, then I took a pair of costume fairy wings, separated them down the middle, and inserted them into the openings, securing them with a little duct tape on the inside.
To secure the ends of the shell’s white rim, we also used a little duct tape and then painted over it with white paint. I’m sure there was probably a more professional way to do it, but this worked—and that’s what matters!
2. Making the Koopa General Armor
Creating the Chest Piece
After the shell, the armor was actually much easier!
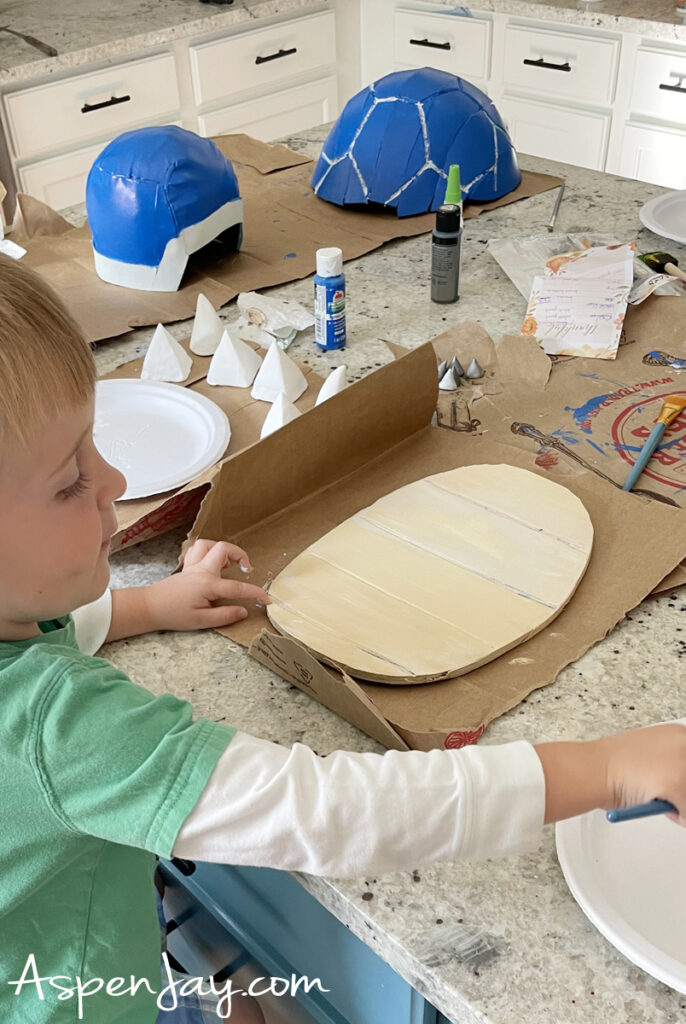
Originally, I grabbed some of the thicker EVA foam—the same foam I used for the Koopa shell—thinking it would work well for the chest piece. It turned out to be way too stiff and made it difficult for my little guy to move comfortably with the costume.
So learn from my mistake—use the thinner foam!
I used thin adhesive-backed foam instead, which worked much better. Since it already had adhesive on one side, I could simply attach it like a sticker. It was also forgiving because I could carefully lift a section and reposition it if I needed to. That was actually pretty nice because after Halloween, I was able to take off the sticker, and it became one of my son’s favorite pajamas to wear!
To create the turtle-shell/belly grooves, I used my soldering iron to carefully melt the lines into the foam. Because this foam is very thin, be especially careful not to burn too deeply.
Thankfully, the foam was just the right color of yellow, so I got to skip the whole painting process and simply attached it to the yellow outfit.
The photo below shows my original attempt with the thicker foam—so learn from my mistake and don’t do what I did!
Making the Chestplate
I also made the chestplate using the thinner foam, and it worked great.
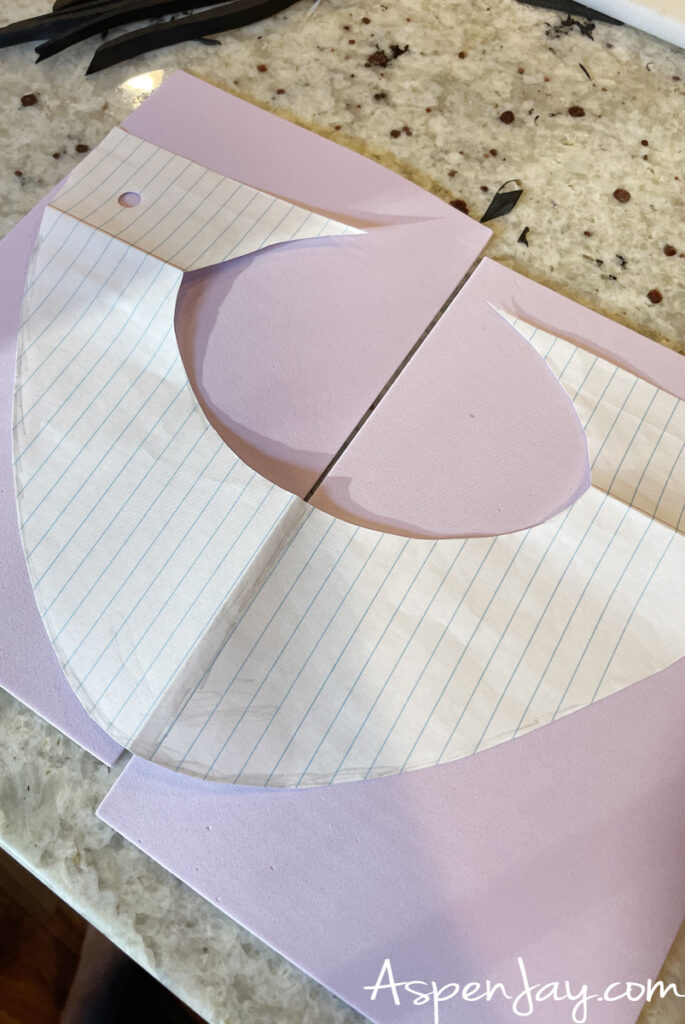
I started by creating a paper stencil and then used it to cut the foam into the shape I wanted. To help the piece bend and lay properly over the shoulders, I cut horizontal lines across the areas that needed to curve.
Sadly, this one did require some painting, so I sprayed the chestplate with Plasti Dip, painted it, and then used a little Velcro on the back to attach it to the costume.
3. Making the Koopa General Helmet
The Helmet Form
This one had me completely stumped at first. I had no idea how I was going to make a Koopa General helmet, so I just got to work and pretended I knew what I was doing! 😂
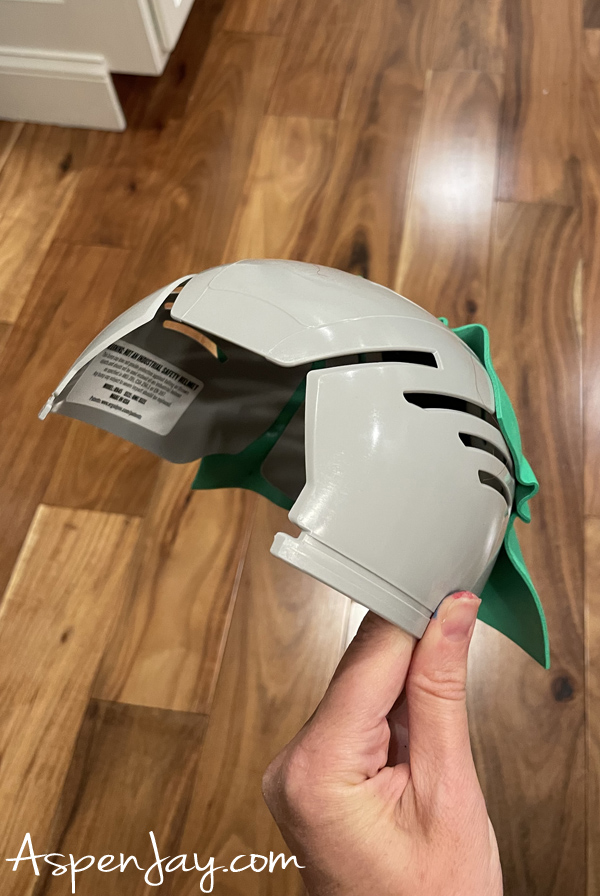
My husband had this lightweight plastic helmet-like shell from work. I’m honestly not even sure what he uses it for, but when I saw it, I knew there was potential! I seriously had to research what the thing was so that I could tell you in this blog post! It turns out, it’s a plastic bump cap insert used inside a hat for lightweight head protection from bumps and scrapes.
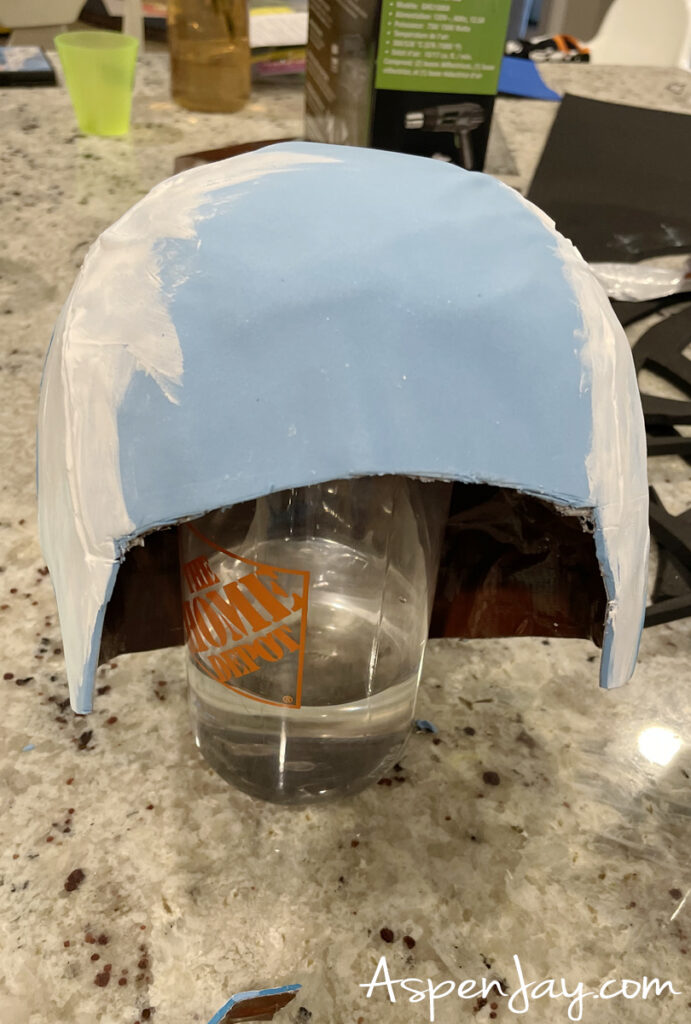
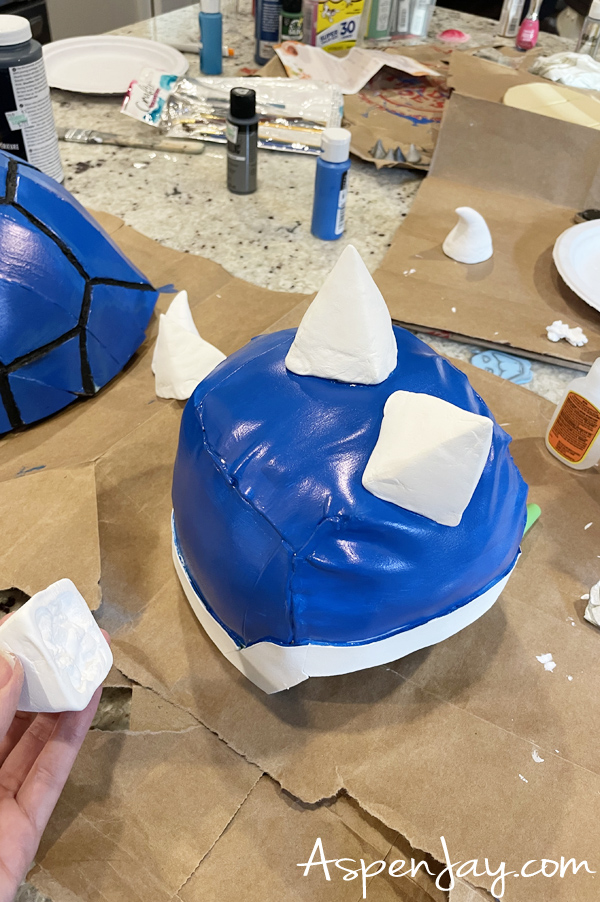
I covered the helmet-thing with the same thin, adhesive-backed foam I had used for the chest piece. From there, I built out the shape and size I wanted, basically creating the Koopa General helmet around the original piece. I mostly eyeballed it as I went.
The adhesive-backed foam made this surprisingly easy because it was simple to attach—and forgiving enough that I could lift a section and reposition it if I didn’t get it right the first time.
Once I had the basic helmet shape, I used some gesso/canvas primer to fill in the gaps.
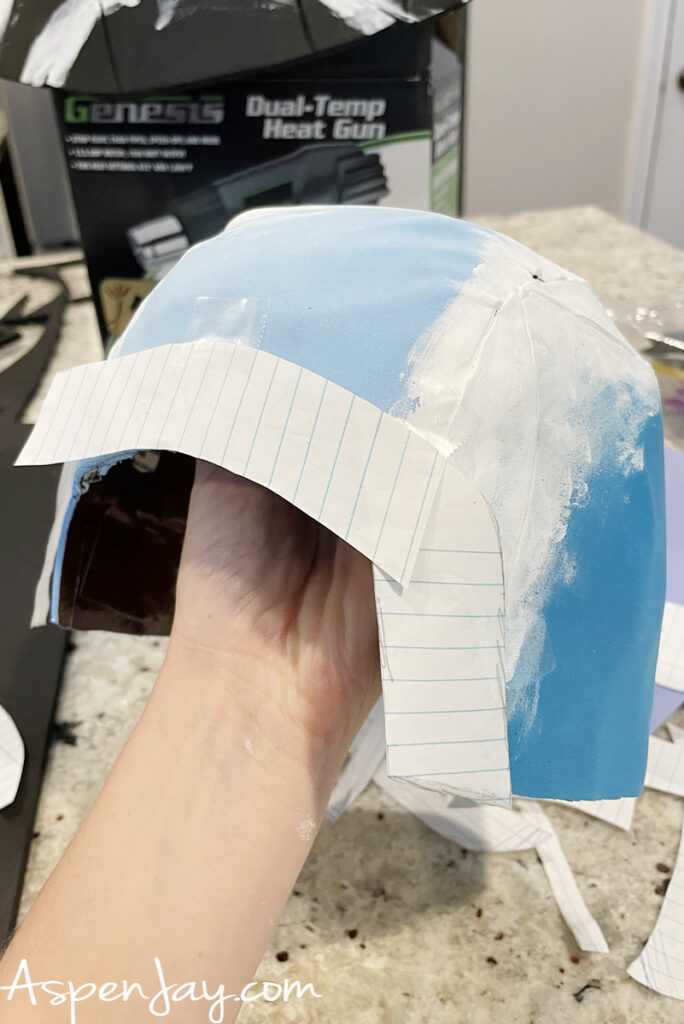
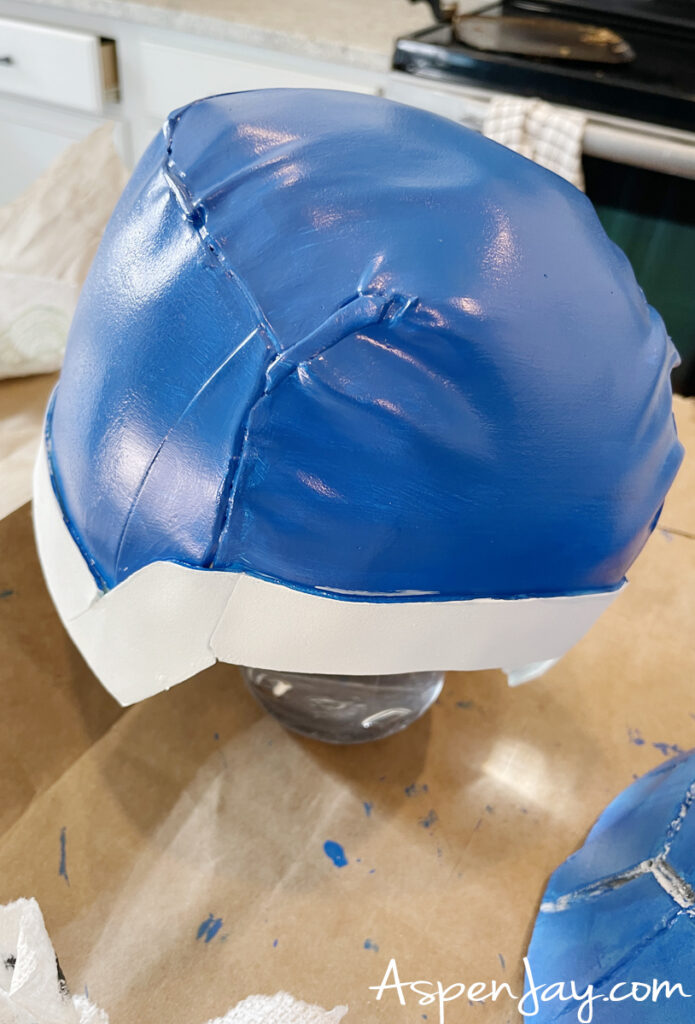
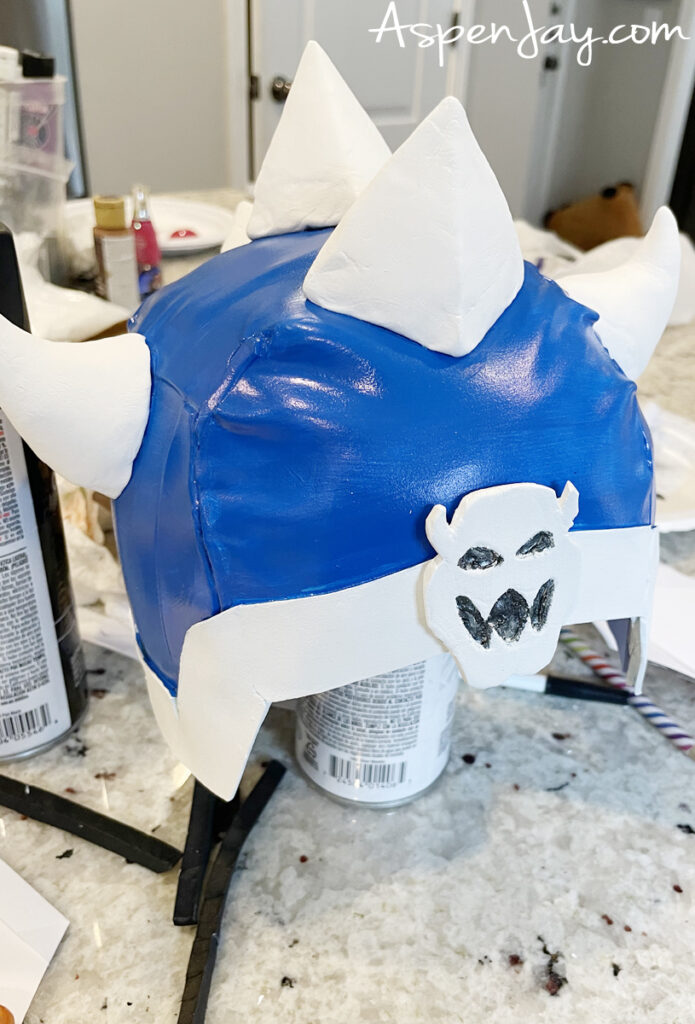
For the rim of the helmet, I made another paper stencil to get the shape I wanted and then cut it from more of the adhesive-backed foam. I sprayed it with Plasti Dip and then painted it blue and white.
Helmet Details
For the four pyramid-shaped spikes on top and in the back, plus the two horns on the sides, I used moldable foam clay. Once they were dry, I attached them with—you guessed it—super glue!
I also used the thin adhesive-backed foam to create the Bowser symbol on the front of the helmet. I drew the shape as closely as I could to the symbol on the Koopa General’s helmet, cut it out, and painted it white with black details.
Finally, I added a leather strap with a buckle to the helmet to match the look of the Koopa General in the movie.
4. Adding the Final Details
Don’t forget the blue high-top shoes! They really are the finishing touch to this Koopa General costume. Imagine the whole outfit with plain old sneakers—nope! It would throw the whole thing off.
I actually scored some blue high-top shoes at the thrift store, only to discover that I already had the perfect pair of blue high-top Converse shoes sitting at home. So much for being proactive! 😂
My little guy also had fun carrying a small staff that I’d made for one of our Alice in Wonderland costumes a few years earlier.
Our Finished Koopa General Costume
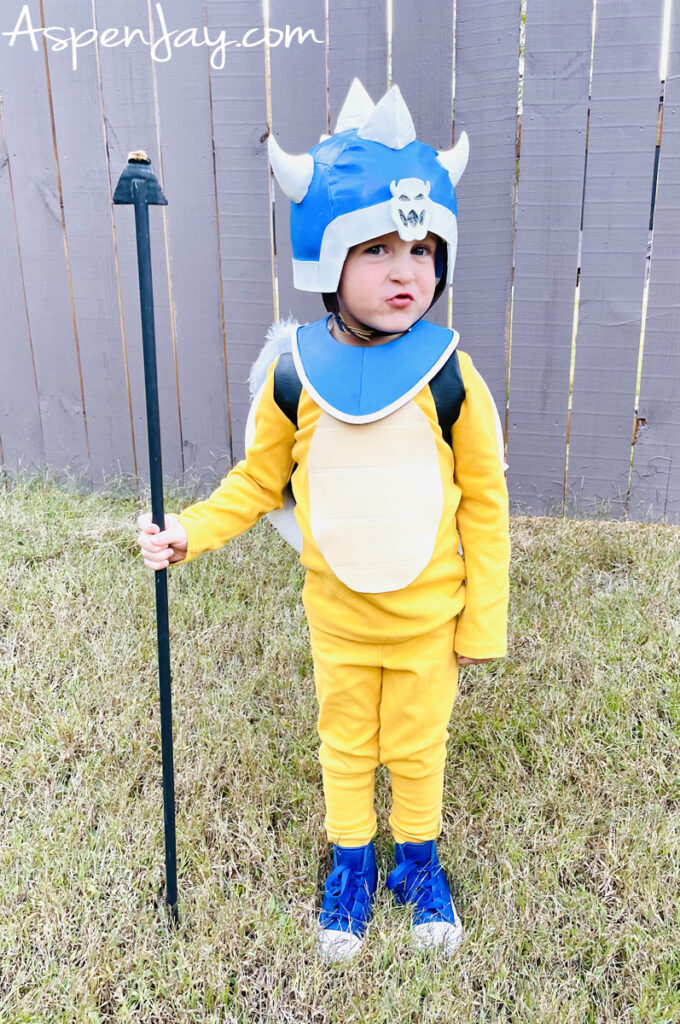
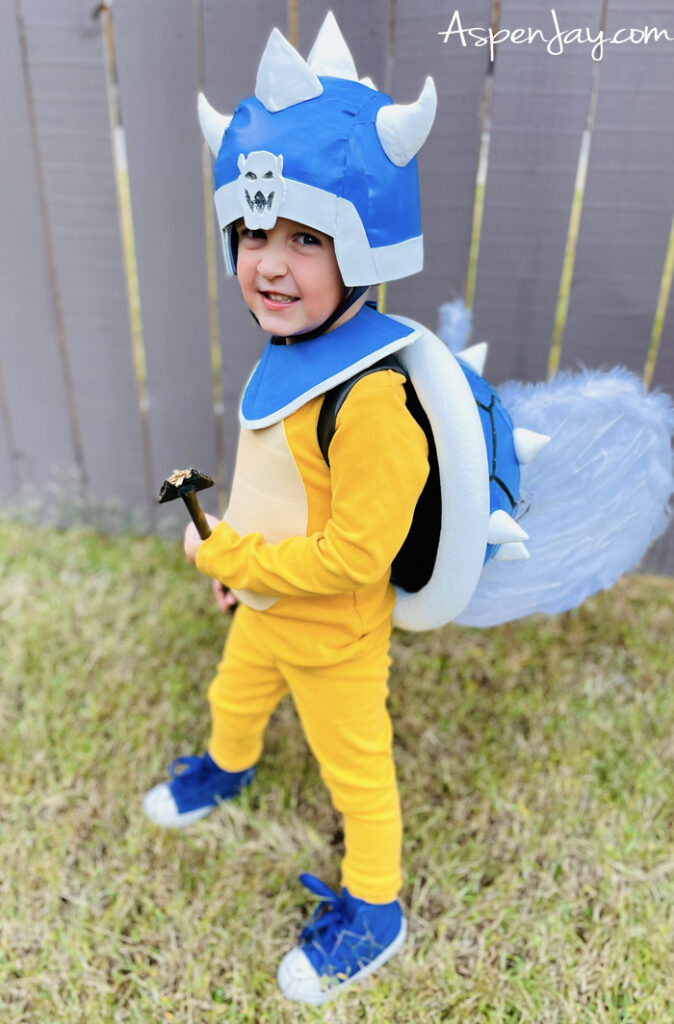
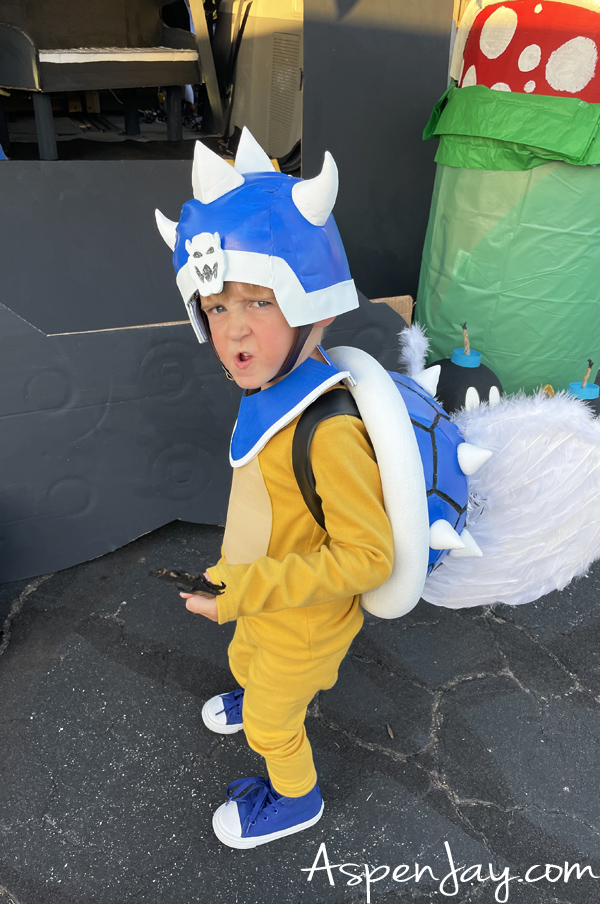
I couldn’t be more thrilled with how this Koopa General costume turned out—and my little guy absolutely loved it! He really got into character, which made all of the time and effort that went into making the costume completely worth it.
I honestly wasn’t sure how this project was going to turn out when I first started making it. But seeing the finished costume on him was one of those moments where I thought, “I actually made that!” Time for a little pat on the back!
Tips for Making a Koopa General Costume
Give yourself plenty of time. This isn’t a costume you’ll want to start the night before Halloween! There are several pieces to make, and you’ll need to allow time for glue, primer, paint, and foam clay to dry.
Don’t be afraid to improvise. I definitely didn’t have a perfect plan for every part of this costume. Several pieces came together as I worked on them.
Use thinner foam for the armor. Trust me on this one! I originally tried thicker foam and quickly realized it was too stiff. The thinner adhesive-backed foam worked much better.
Test your heat gun on scrap foam first. If you’ve never worked with EVA foam before, practice heating and shaping a scrap piece before working on your actual costume. Or just go for it if you’re feeling brave, like I did! Haha!
Work in a well-ventilated area. I used the soldering iron and Plasti Dip outside, and I’d recommend following the safety directions for all of your tools and materials.
Don’t worry about making it perfect. It will all come together! Just trust the process, and believe me, you’ll be amazed at what you can create yourself.
Make It a Super Mario Bros. Family Costume
Even though the Koopa General costume can definitely stand on its own, why stop there? Make it a party and get your friends or family involved by dressing up as some of the other iconic Super Mario Bros. characters!
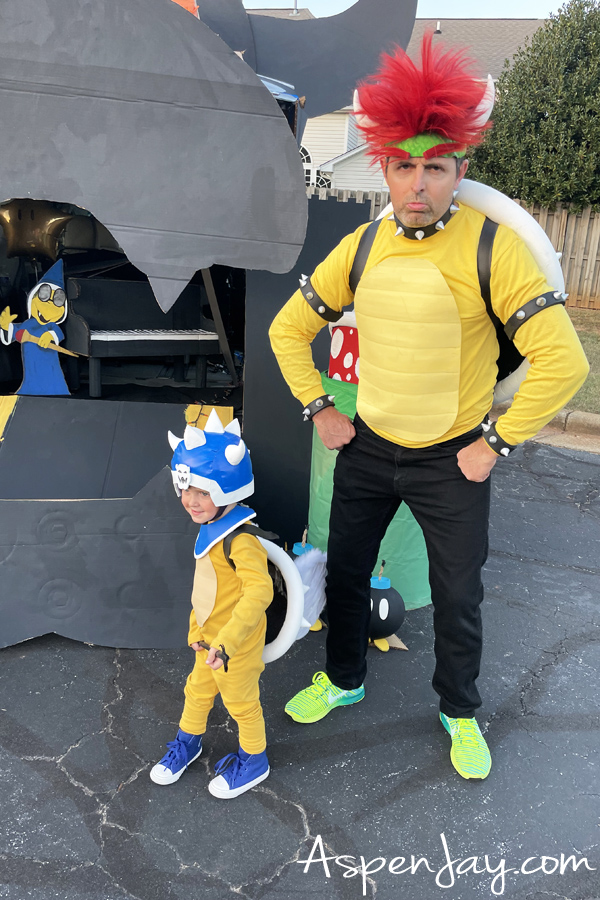
That’s exactly what we did for Halloween. With seven people in our family, we decided to turn the whole thing into a Super Mario-themed family costume. My daughter was the cutest little Toad, while my boys dressed up as Mario, Luigi, Donkey Kong, and, of course, the Koopa General. I took on the role of Princess Peach (remember, I’m the “big” one—ha!), and my husband was Bowser.
It was so much fun seeing the whole group together, and our Super Mario costumes ended up being one of our favorite Halloween themes we’ve done so far!
The Koopa General would be fun paired with Mario, Luigi, Bowser, Peach, Toad, or even another Koopa. Have a little one who wants to dress up as Toad? Check out our DIY Toad costume tutorial for another homemade Super Mario costume idea.
Whether you’re dressing up two siblings, a group of friends, or the whole family, the great thing about the Super Mario characters is that you can mix and match them to create a fun group costume at almost any size. And, of course, it makes for some pretty awesome Halloween pictures!

Koopa General Costume FAQs
Who is the Koopa General?
The Koopa General is a villain and one of Bowser’s loyal soldiers in The Super Mario Bros. Movie. He is recognizable by his blue armor, shell, spikes, wings, and distinctive helmet.
What do I need to make a Koopa General costume?
You’ll need EVA foam, thin adhesive-backed foam, foam clay, acrylic paint, Plasti Dip, super glue, faux leather, costume wings, a yellow outfit, and blue high-top shoes, along with a few basic crafting tools. You can find the complete supply list near the top of this post!
Is a DIY Koopa General costume difficult to make?
This is a more involved homemade Halloween costume, but you don’t need previous experience to make it. I had never used a heat gun before making this costume! The key is to work on one piece at a time and give yourself plenty of time.
How long does it take to make a Koopa General costume?
I made the costume over the span of a few days. Part of that was because I wasn’t exactly sure what I was doing, and part of it was because I couldn’t devote all my time to the project with everything else going on. If you’re making this costume, I’d definitely give yourself several days rather than trying to tackle it all at once.
Hope You Enjoyed This DIY Koopa General Costume!
Best of luck making your Koopa General costume! You can do it, and all the hard work will definitely pay off when you see how excited your child is to wear it! Will you be pairing it with any other Super Mario Bros. costumes? Let me know in the comments below!
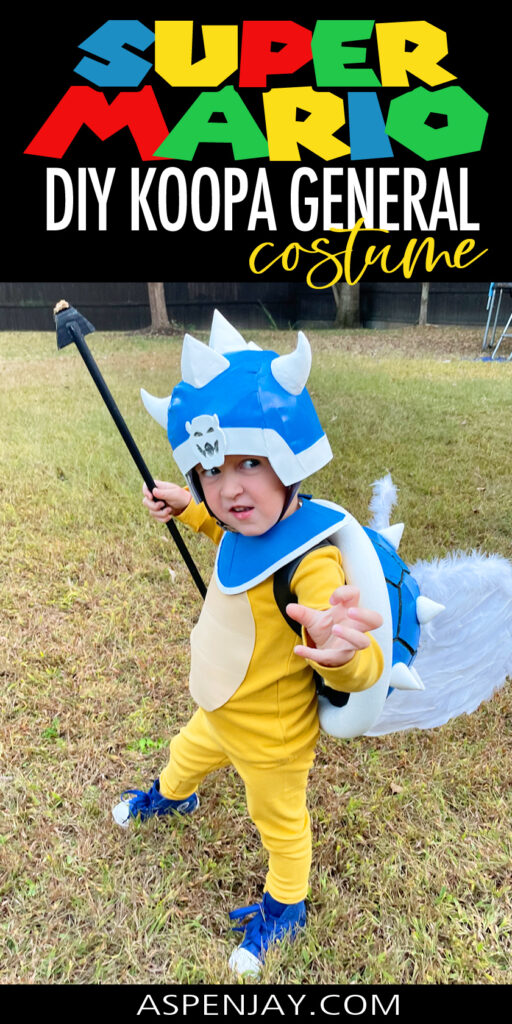
Found this helpful? PIN it to your Halloween board! Your support means the world and keeps more fun tutorials coming.
Leave a Reply